Followers

Saturday, May 31, 2014

For you, with love


Hello Copic fans,

today it's my turn again to show you a card and it is also the last card I've made for this blog.
The time being a member of the DT I've done it with pleasure and it gave my lots of fun making the cards for this blog. However, I decided to stop to gave other persons a change to join this DT
And as far as I know there is even a waiting list for this DT.
For the people who are interested in my work, I will remain a member of the Copic Marker Benelux team, so if you want it, you can follow me on that blog.

Now something about the card. The design paper is from "Graphic 45" from the series "Botanical Tea".
I love this paper line.


On the card for today I used a "Wee stamp" because these stamps are always so cute


 All three flowers are made by myself with a stamp from "IndigoBlu" called "poinsettia". This time I stamped it on "vellum" paper with "VersaMark" ink.

Then I sprinkled the stamp with embossing powder and directly heated the powder with my heat tool to fix it.
After that I cut out the flower and then it is ready to put it on the card.
The dies "for you" and "with love" are from "Tattered Lace".


These flowers are made in four layers. After punching out the flowers I coloured them with ink and put the layers together.
I used two kind of different leaves and these are both also from "Tattered Lace" named "Ornate Leaves" and these are also so beautiful.


The colours used are:
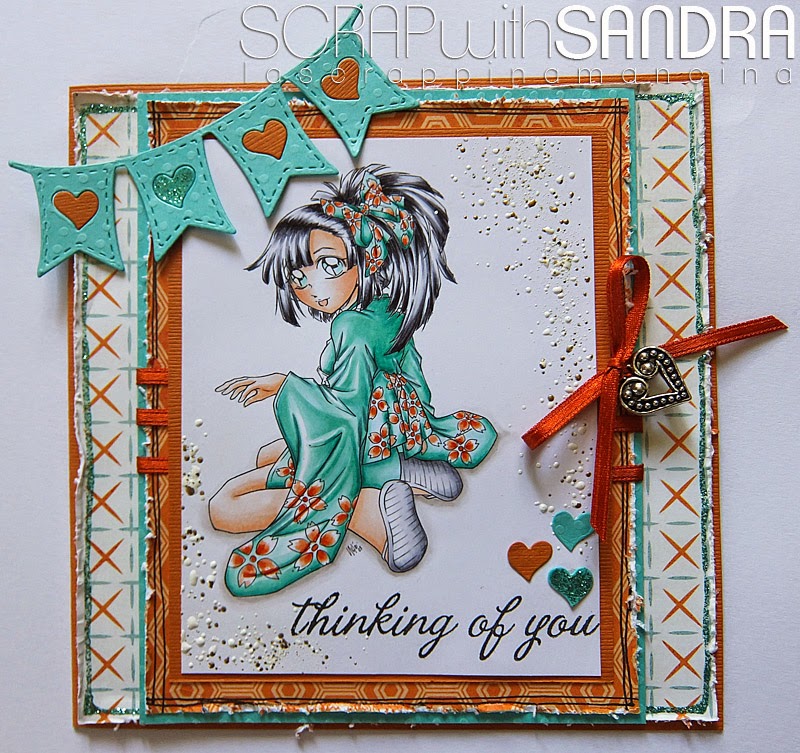
Hair: E37 - YR24 - YR26 - Y15 - E30
Skin: R22 - R20 - E11 - E00 - E000
Blue: B37 - B45 - B32 - B21
Pink: RV95 - R83 - R81 - RV10
Wings: Y000 - YG0000 - B000 - B0000 - RV000 - RV0000
Background: B01 - B00 - B000 - B0000

I hope I inspired you with my last card for this blog and hope to see you again in blog land or at my own blog.

Thursday, May 29, 2014

Keep on Rockin... and Airbrushing!


Hello everyone! It's Delphine here today to share another 100% Copic card with a little bit of airbrushing this time. I love all kinds of backgrounds on images and airbrushing is a very simple and nice way to make a background! Here is what I have done...


I used a Make It Crafty digi called Felicity, masked her and put my Dutch Doobadoo Bricks Mask over her. I then used my airbrush, going from my lightest colour (to make sure I didn't go too dark) to my darkest and then back from the darkest to my lightest to "blend" it all a little. I removed the stencil and airbrushed some E42 in places so the white between the bricks would not be too white. I then coloured Felicity with my Copics and added a sentiment by Some Odd Girl. 


Skin: E000, 00, 02, 11, 23, R20
Hair: 100, C5, 7, 9
Eyes: BG000
Shorts, Scarf, Hat: V09, 12, 15, 17
Jacket: E81, 84, 87, 89, Y26
Boots: C3, 5, 7, 9, Y26
Bricks: E13, 15, 19, 35, 42
Ground: W1, 3

I hope I have inspired you to try airbrushing too! Thank you very much for your visit, have a lovely day! Hugs,
Delphine xx

Tuesday, May 27, 2014

Blossom


Good Morning,

I have a card to share with you using the new CC Designs image Blossom and a few of the coming soon June release Marianne Design Dies. The frame is called Petra's Circle and Crown LR0317 and the insert corner that I used on the top and bottom of the circle frame is called Petra's Small Ornament LR0319.  To the left I have used the new Petra's Rectange, look out for them due into stores at the end of May.


The backing paper is by Magnolia and called Forget Me Not.


Copics Used:-

Skin E000, E00, E11, E04 and R20 for blush
Hair E31, E35, E47
Dress B18, B16, B14, B12, B01, G94, G82, G20
Bow B18, B16, B12, B01
Flower Y15, Y11, Y00
Ground Cast Shadow W1, W3

Hugs Tracy x


Follow Me on Pinterest

Saturday, May 24, 2014

For a young Lady...


Hello, dear Copic Fans,
Today, it's me, Barbara/Kreativmonster, to share a card with you. 

A collegue asked me for a card for the "Jugendweihe" of a friend's daughter. I do not know if this occasion is something german, it is very close to confirmation, but without religious background. 
It is a very festive occasion to tell young people, that they are accepted as members of the comunity.

 So, what we need is a card for a girl of 13 years, obviously no child anymore, wearing a beautifull blue dress - not too much bling-bling.

I hope, she will see herself in this image from Saturated Canary!
 
 I tried to keep it simple, just some very small rhinestones on the Vintage Flourish from Noor!Design, a ribbon and a sentiment (Noor! Deisgn, too) that means "You are unique 365 days a year".

So you can imagine, I am very nervous to hear if she liked it!

I used these Copic Markers to colour the image:
Skin: E50, E51, E01, E02
Hair: E50, E42, E43, E44
Dress, Butterflies: B0000, B000, B12, B14, B16
Shadows: N1, N3,N4


Big Hugs
Barbara/Kreativmonster

Friday, May 23, 2014

Winner of Challenge 28

Hello dear Copic Fans,
It's me again, Barbara/Kreativmonster,
for the Copic Marker Europe Blog Challenge.

Here comes the winner of
Challenge 27, "Out of my Comfort Zone", it is....
#13 Maritha


She tells us, that Yellow is soooo not her comfort zone colour...

Congratulation, Maritha! Please send us an email to copiceurope@gmail.com

with your request for 3 Copic Sketch markers.

Hugs
Barbara/Kreativmonster
for
CME team

Thursday, May 22, 2014

Denis in Paris


I'm Cristina Valenzuela and today is my day to post here at the blog of Copic Europe. 
My card is very romantic. This Saturated Canary Stamp is a love, it's really nice, makes one think about Paris, and the Champs Elysees which is full of flowers at this time of year ...


 I chose soft colours, violet, brown, and I played with textures. 
Copic colours that I used: 
Hair: E51, E57, E53. 
Skin: E000, E00, E21, and cheeks R11. 
Lips: RV42. 
Eyes: B91, B93. 
Skirt, hat and bag: RV91, RV93, RV95, W3. 
Socks: RV91, W3, W5. 
Coat: E70, E71, E74. Interior of coat: E79, E77, E74.
White T-shirt and boots: C3, C1, C0, Blender. 
Black in boots: C7, C5, C3.


Hope you like it!
Thank you very much!

Wednesday, May 21, 2014

New Challenge


Hello Copic Fans,
It's me again, Barbara/Kreativmonster for the
Copic Marker Europe Blog Challenge.

The results of our last challenge  "Out of my Comfort Zone" were really interesting to look at! Thanks a lot! The winner will be announced on Friday, 23rd May 2014.

Our new Challenge is an interesting  one, too, it is 

Under Water

On this blog, we had two great tutorials about this recently and now we want to see your creations! Here you find the tutorials:

Franz


Kathrin 
 

So now, it's your turn! Show us your work, and you can win
3 sketch markers of your choice.
Please be aware that only entries from those living in Europe, North Africa and the Middle East are possible.

To enter visit our Challenge page and enter your link in Mr Linky
before the end of 17th June 2014.

The winner will be announced 21st of June 2014.

We are looking forward to see your creations!
Hugs
Barbara/Kreativmonster
for CME team

Tuesday, May 20, 2014

Copic Scandinavian style...

Hi there Everyone,

Ã…sa here today with some Copic inspiration for you.

For this card I have used one of my top favourite images from Wee Stamps.


I have combined the image with some wonderful springflower papers from Pion Design.
And put it together with some flowers from Wild Orchid Crafts.
I like to distress all the edges with Frayed Burlap to make it look a little more 'worked'.


I have used a colouring technique called Skandinavian Colouring.

It´s mainly the choosen colours that distinguishes this technique,
and this is a technique I use a lot.
I love the colour scene and it´s perfect together with those Pion papers.


I have used the following colours:
Skin: E21-11-00-000-R20-11
Hair: E44-43-42-41
Clothes: BG72-71-70
Flowers: V95-93-91
Leafs: G24-21-20

Don´t forget that you can use the Copic colourwheel for help choosing the right colour combinations.
You can read more about it here.

Have a wonderful day!

Sunday, May 18, 2014

Underwater Background Tutorial

Hello everyone!
This is Kathrin here today and I want to share a tutorial for how to make an underwater background with the airbrush system and our beloved Copics.

First stamp your image on a quite large piece of paper - it will be cut down to the desired size afterwards but the result is better if your paper is bigger and you get an idea where to airbrush which color if you're able to see the actual image. Then stamp your image again on masking tape and put it on top of the stamped image.
For my card I used the Aquarius stamp by Whiff Of Joy.


Now put the E43 marker in your airbrush system and spray a line of color a little lower than the middle of your image. 


Then use E42 underneath the E43. This will later be the sand ground.


Next color we use is BG23. Place strip of this over the E43 line, going slightly into the E43 color.


Then use BG11 where the BG23 and E43 meet to kind of blend those colors together. You should go into the E43 line because this will later look like a real underwater background where ground and water meet.


Now let's bring in some stronger colors. Usa BG05 above the BG23 line, again blending them together a little.


Then I used the BG07 and added it in about the middle of the BG05 strip that we sprayed before.


Since the color of the water looks lighter the closer we get to the air I went on with BG02.


And the last and lightest color I used is BG53. I made this strip a little thicker because, as I mentioned before, the image/background will later be cut down in size to fit our card.


As the next step I took off the masking tape und colored the image in.


To make the ground look more real I used the E43 marker and drew some lines on the ground like the waves create on the sandy ground in the real sea.


Then I used E42 on those lines again, making them just a tad thicker than the E43 lines.


Now we need some sun beams. Therefor I put on the masking tape again - just because it's easier to not have to pay too much attention to not go over the colord image. Then I decided where my light should come from and used BG0000 and BG000 to draw the sun beams. Since the layer of color is really thin if you use the airbrush system, using the Colorless Blender would create too much contrast and the beams would look unreal. I also used the YR30 just at the top area of my beams to give them a sunny touch.


When you take off the masking tape again you can see that the sun beams look quite natural and seem to go behind the image.


As a last step and to make the scene look even more real I used BG96 and BG93 and drew some seaweed in the background. As you will see on the pictures of the finished card I later decided to add some more in the front of the scene.

All that's left to do now is to use this on your card. And here's mine:


I made a center step card, putting the image in the focus.
I put some flourishes that remind me of seaweed next to the image and added a punched out ancor. Underneath the image I used some cheesecloth ad added a few pearls to it.
The saying is by Catslife Press.
And I also decided to add a little bottle with "sand" - made using light brown/golden glitter - and a little message...
The mermaid tail and the crown got some Stickles to add some sparkle.

Here's a closeup of the finished image and how it looks cut down:


And these are the Copics that I used to color the mermaid in:

skin: E31, E11, E51, E30, E000
cheeks: R32, R20
mermaid tail: BG75, BG72, BG70, G20, YG11, YG23, YG25
hair: E47, E44, E42, E41, E40
crown and whatever it is called that she holds in her hand: C3, C1, C0

Hope this tutorial is helpful to you and you enjoyed this trip into the tropical sea! ;)


Saturday, May 17, 2014

Girl in a mini Kimono

Hello everyone Copic fans
Here I am to propose my new card .
For this new project I colored a  Sureya digi stamp"Girl in a mini Kimono" .
 I find it really , really great .
To be honest , it was already a bit of time that I had in mind to color this sweet Geisha but it was not yet the right time to start !
The spring flowers and sunny days have finally give me the right inspiration so I decided to throw the challenge and color this stamp .
Coloring this stamp is really a big challenge . I thought a lot before deciding what colors to use to color it.
This dress is so delicate and refined that I did not want to risk ruining it using colors that are too bright or not indicated.
Then I decided to go with  colors of the BG family that remind me a lot the colors of the silk that japanese used to make Kimono.
So,  very gently , almost holding my breath ( ... ☺ ) I started coloring.
When I finish with the BG family, I chose the YR family for the flowers .
I was looking for an unusual combination , a bit risky , but that made a special effect . 
I must say that I found it, this combination of colors I like very much!
I finished the hair with the C , because the oriental girls are very famous for their long shiny hair , dark and unmistakable.
At this point, I made a  clean and simple card  because I wanted to give the stamp a place of honor i in my project... without distractions! I used bazzil cardstock, My Mind's eye pattern , frantage and La la land crafts banner die.
Thanks again for follow me  , and I hope that you enjoyed my project.
Ciao ciao
Sandra

Copic used:
Dress: BG10-11-15-18 - YR 61-65-68
Skin: E0000-000-00-01-93
Hair and shoes: C00-1-3-5-9
Shadow: W00-1-3


Thursday, May 15, 2014

Be mine!

Hello everybody Copic friends!
 
Franz here again to share my latest copic project with you all.
The image I chosen for my card is a Mo's lovely girl again:


Strong girl right?! I had lot of fun colouring her hair and her jacket!

I used the Dutch Doobadoo mask - Bricks to draw the background:


Here is the card, clear and simple due to the colouring, I love cas cards when the image has a coloured background!
 
 
 Here is the complete list of Copics markers I've used:

 Skin:
 E0000-E000-E00-E11-E13
+R20 for cheecks;
 
 Hair:
 C1-C7-100;
 
Eyes:
B91-B93-B95;

Lips:
R81-R83-R85;

Outfit:
Black: C1-C3-C5-C7-C9
White: W1-W3-W5
Violet: V000-V1-V4-V6;

Floor:
W1-W3-W5-W7;

Bricks Background:
E18-E15-E13-E11-E00-E40-W1;
 
thanks for watching, I hope you liked it :)
Franz.